qryptic-docs
Qryptic Documentation
1. Overview
Qryptic is a modern, open-source Zero Trust Network Access (ZTNA) solution powered by WireGuard, providing secure, fast, reliable and time-bound network access management. Unlike traditional VPNs, ZTNA ensures that users only access the specific resources they need, minimizing security risks and improving overall control.
🚀 Why ZTNA and Qryptic?
ZTNA is a modern and secure alternative to VPNs. Traditional VPNs grant broad network access, often leading to security risks and compliance challenges. ZTNA takes a different approach by ensuring least-privilege access and enforcing security policies at every step.
However, many ZTNA solutions present challenges such as:
-
Infrastructure Control:
Does your ZTNA solution place all the controls within your own infrastructure (data center or cloud), or is the main controlling interface managed by the vendor?
Qryptic ensures you have full control over your infrastructure. -
Public Exposure of Internal Tools:
Are internally hosted third-party tools exposed to the public even when needed by only a few teams?
Qryptic helps segment and control access efficiently. -
Data Residency & Compliance Challenges:
Are you struggling with regulatory requirements related to data residency and localization?
Qryptic is designed to meet compliance needs by allowing self-hosting within your environment. -
Cost of Adoption:
Is onboarding a ZTNA solution too costly for your growing startup?
Qryptic provides an affordable, self-hosted alternative without recurring costs. -
One VPN for All?
Does your team rely on a single VPN to access internal services, leading to bottlenecks and security risks?
With Qryptic, you can manage multiple VPNs for different use cases from a single interface.
🔑 What Makes Qryptic Different?
Qryptic offers:
✅ End-to-End Hosting: Host the entire solution within your infrastructure, ensuring full control over data and security policies.
✅ Multi-VPN Management: Manage multiple VPNs for different use cases via a centralized interface.
✅ WireGuard-Powered Security: Benefit from WireGuard’s robust encryption and high-speed performance.
✅ Open Source Flexibility: Customize and extend the solution to meet your specific business needs.
✅ Compliance-Focused: Stay compliant with evolving regulatory requirements without vendor lock-in.
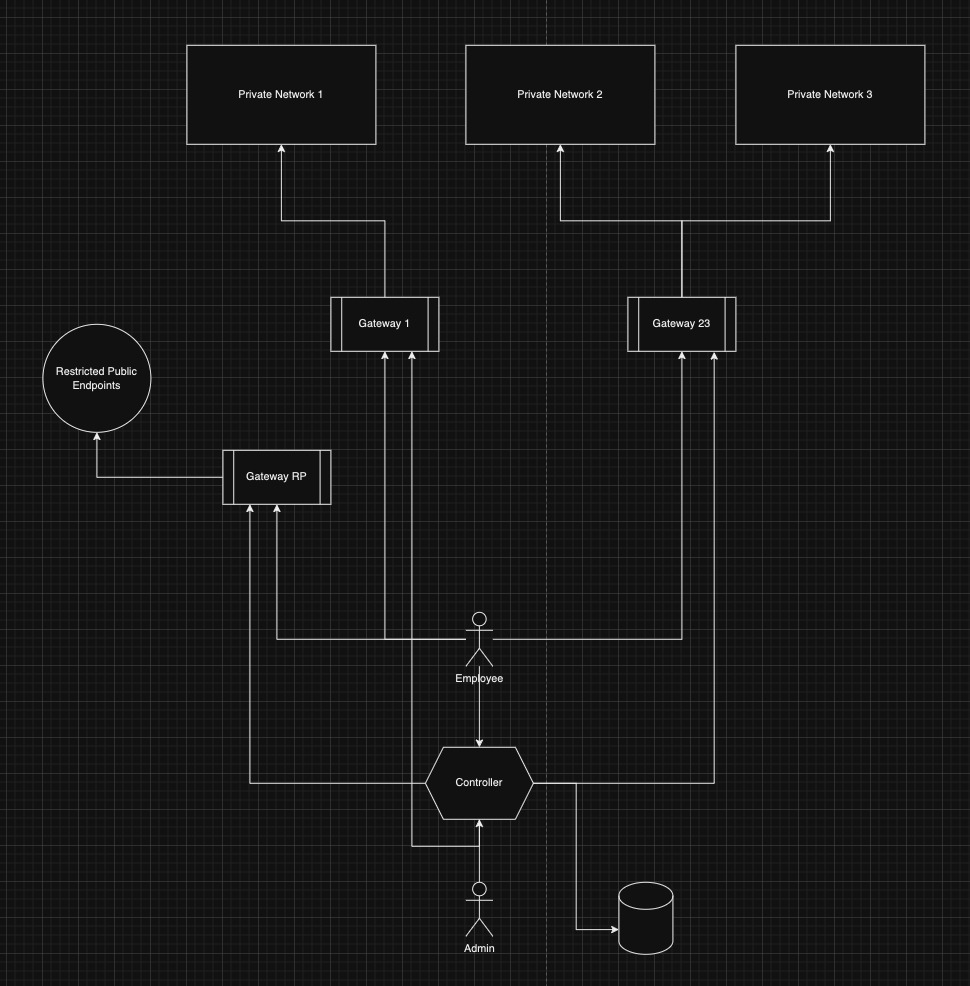
It consists of the following components:
-
Controller:
- Manages users, groups, gateways, and access policies.
- Generates time-bound client configurations for users.
- Communicates with gateways to enforce access controls.
-
Gateway:
- Enforces access controls using WireGuard.
- Dynamically updates its configuration based on instructions from the Controller.
-
User:
- Employees or users who need access to gateways.
- Admins can manage the Controller and gateways.
-
Group:
- A collection of users (e.g., a team) with shared access to gateways.
-
Client:
- A temporary WireGuard configuration provided to users for connecting to gateways.
- Automatically deleted by a cron job upon expiry.
2. Architecture
High-Level Architecture
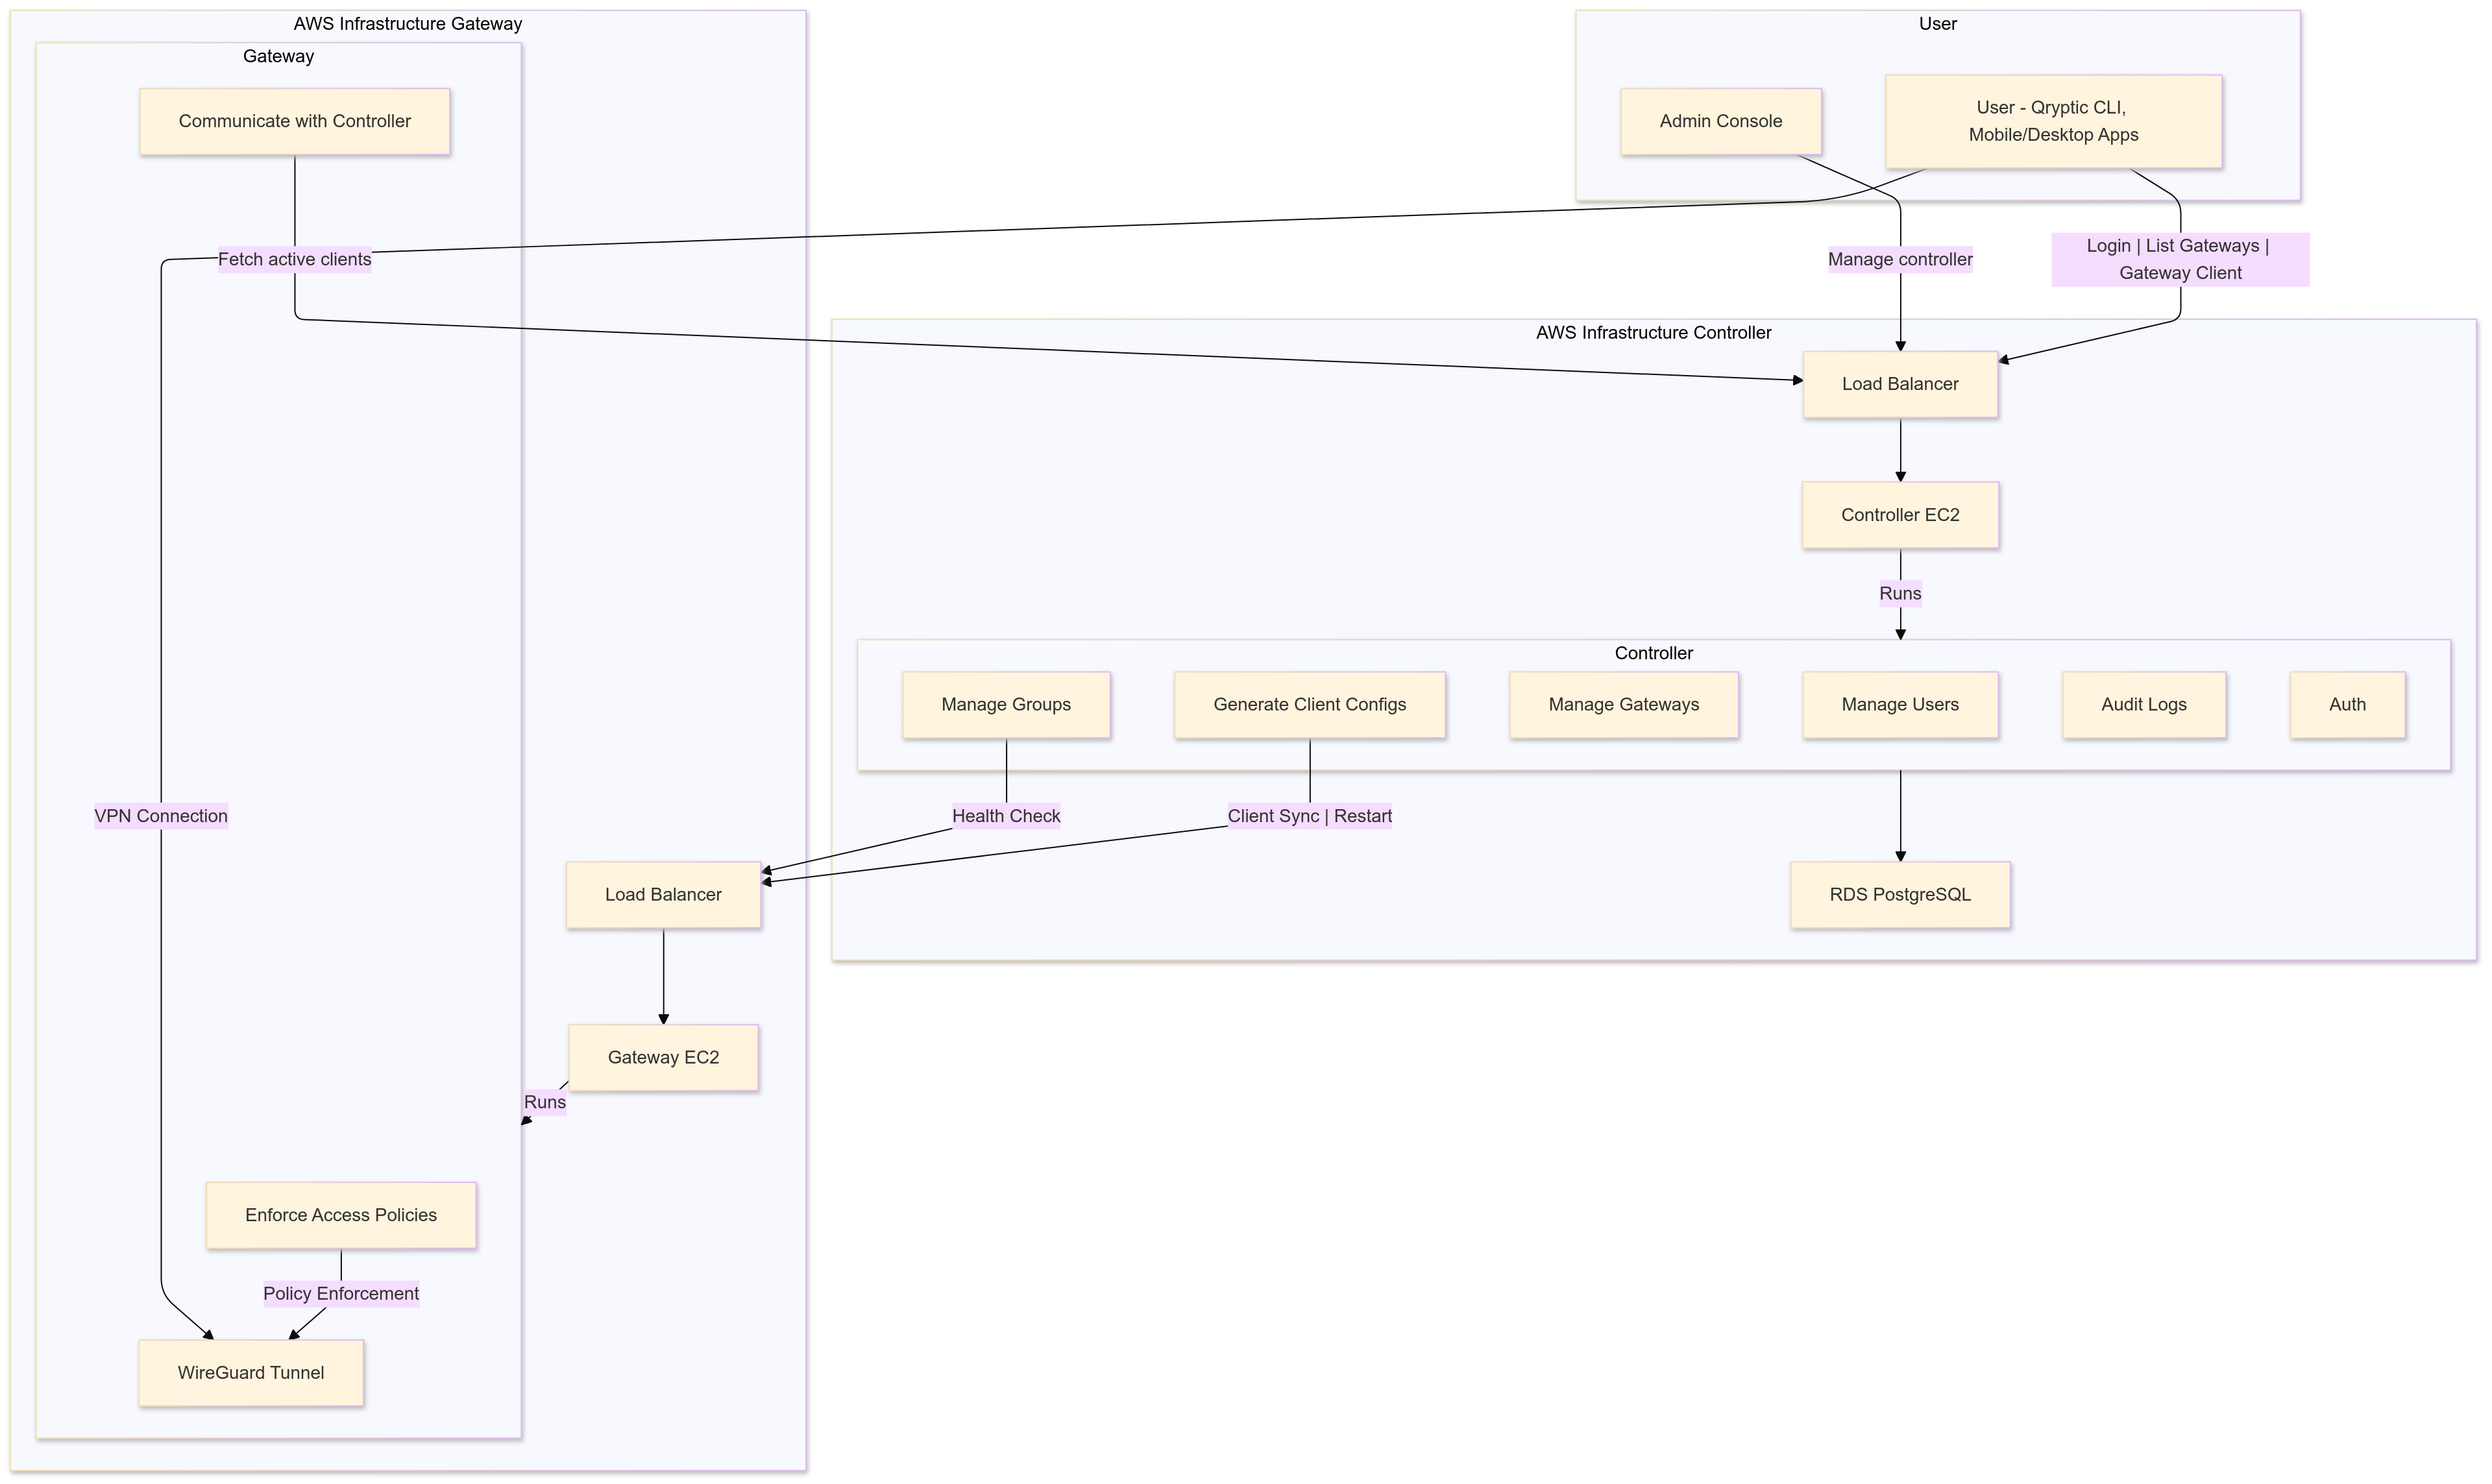
-
Controller and Web:
- Controller is Backend API service and Web is Frontend of it
- Hosted on a private EC2 instance (AWS) or Kubernetes cluster.
- Manages users, groups, and gateways.
- Generates time-bound client configurations.
-
Gateway:
- Hosted on a public EC2 instance (AWS) with a public IP.
- Enforces access controls using WireGuard.
- Communicates with the Controller via HTTPS.
-
User:
- Connects to the Gateway using the Qryptic CLI or mobile/desktop apps.
- Uses time-bound client configurations provided by the Controller.
-
Database:
- PostgreSQL database (AWS RDS) for storing user, group, and gateway data.
-
Load Balancer:
- AWS Application Load Balancer (ALB) for routing traffic to the Controller and Gateway.
- HTTPS termination using ACM certificates.
3. Setup Guide
3.1. Prerequisites
- AWS account with permissions to create EC2 instances, RDS, ALB, and Route53.
- Docker installed on EC2 instances.
- Custom domain (e.g.,
qryptic.example.com).
3.2. Deploy the Controller
Step 1: Create an RDS PostgreSQL Database
Step 2: Set Up Route53, ALB, and Target Group
-
Route53:
- Go to the Route53 Dashboard.
- Create a hosted zone for your domain (e.g.,
qryptic.example.com). - Add an A record pointing to the ALB.
-
ACM Certificate:
- Go to the ACM Dashboard.
- Request a public certificate for your domain (e.g.,
qryptic.example.com). - Validate the certificate using DNS validation.
-
ALB:
- Go to the EC2 Dashboard > Load Balancers.
- Click Create Load Balancer and choose Application Load Balancer.
- Configure the ALB:
- Name:
qryptic-controller-alb. - Scheme: Internet-facing.
- Listeners:
- Add a listener for port
443(HTTPS) and attach the ACM certificate. - Add a listener for port
80(HTTP) to redirect to port443.
- Add a listener for port
- Name:
- Under Availability Zones:
- Select the VPC and private subnets.
- Under Security Groups:
- Create a new security group or use an existing one.
- Allow Inbound: Port
443from0.0.0.0/0.
- Under Routing:
- Create a new target group (
qryptic-controller-tg) with port8080.
- Create a new target group (
-
Target Group:
- Go to the Target Groups section in the EC2 Dashboard.
- Register the Controller EC2 instance as a target.
-
HTTP to HTTPS Redirection:
- Go to the ALB Listeners tab.
- Add a rule to the port
80listener to redirect all traffic to port443.
Note - Similarly create setup for Web i.e. Frontend of Controller
Step 3: Deploy the Controller and Website on EC2 Instance
-
Launch an EC2 Instance:
- Go to the EC2 Dashboard.
- Click Launch Instance.
- Configure the instance:
- AMI: Amazon Linux 2 or Ubuntu 22.04 LTS.
- Instance Type:
t3.medium. - Key Pair: Use an existing key pair or create a new one.
- Network: Choose the same VPC as the ALB and private subnet.
- Security Group:
- Allow Inbound: Port
8080and8081from the ALB security group. - Allow Outbound: PostgreSQL port (
5432) to the RDS security group.
- Allow Inbound: Port
- Click Launch.
-
Install Docker:
- SSH into the EC2 instance.
- Run the following commands to install Docker:
sudo yum update -y sudo yum install -y docker sudo systemctl start docker sudo systemctl enable docker - Docker Login
aws ecr get-login-password –region ap-south-1 | docker login –username AWS –password-stdin
- Run the Controller (Backend):
- Pull and run the Controller Docker container:
docker run -d -p 8080:8080 \
  -e DBHost="<DB Host>" \
  -e DBPort="5432" \
  -e DBUser="postgres" \
  -e DBPassword='<DB Password>' \
  -e DBName="postgres" \
  -e DBSslMode="disable" \
  -e ControllerDomain="<controller-domain/subdomain>" \
  -e WebDomain="<website url>" \
  -e Environment="<local/development/production - default is production>" \
  -e GatewayImage="<gateway-image>:<gateway-version>" \
  <controller-image>:<controller-version>
- Pull and run the Controller Docker container:
- Run the Website (Frontend):
- Pull and run the Web Docker container:
docker run -d -p 8081:80 \
  -e CONTROLLER_URL="<controller url>" \
  <web-image>:<web-version>
- Pull and run the Web Docker container:
3.3. Deploy the Gateway
Step 1: Launch an EC2 Instance for the Gateway
- Go to the EC2 Dashboard and click Launch Instance.
- Configure the instance:
- AMI: Amazon Linux 2 or Ubuntu 22.04 LTS.
- Instance Type:
t3.small. - Key Pair: Use an existing key pair or create a new one.
- Network: Choose the VPC and a public subnet.
- Security Group:
- Allow Inbound:
- WireGuard UDP Port (
51820) from0.0.0.0/0. - HTTPS Port (
443) from the gateway alb security group.
- WireGuard UDP Port (
- Allow Inbound:
- Click Launch.
- Setup Route53, ALB and Target Group for gateway too similar to controller
Step 2: Install Docker and Run the Gateway
-
Install Docker:
- SSH into the EC2 instance.
- Run the following commands to install Docker:
sudo yum update -y sudo yum install -y docker sudo systemctl start docker sudo systemctl enable docker - Docker Login
aws ecr get-login-password –region ap-south-1 | docker login –username AWS –password-stdin
-
Run the Gateway:
- Pull and run the Gateway Docker container:
Note - Request controller to give the docker config
For eg:
docker run -d --cap-add=NET_ADMIN --cap-add=SYS_MODULE \
        --sysctl='net.ipv4.conf.all.src_valid_mark=1' \
        --sysctl='net.ipv4.ip_forward=1' \
        --sysctl='net.ipv6.conf.all.forwarding=1' \
        -p 51820:51820/udp -p 8080:8080 \
        -e VpnGatewayUuid='<uuid>' \
        -e VpnGatewayControllerJWTSecretKey=<key> \
        -e VpnGatewayControllerJWTAlgorithm='HS256' \
        -e ControllerVGWConfigUrlEndpoint=<url> \
        -e ApplicationPort='8080' \
        <gateway-image>:<gateway-version>
- Pull and run the Gateway Docker container:
Note - Request controller to give the docker config
For eg:
4. Usage
4.1. CLI Tool
-
Install the Qryptic CLI:
- Download the latest version from GitHub Releases.
- Install it on your local machine.
- For macOS
brew tap leetsecure/tap brew install qryptic - Note : Run qryptic as sudo or with root user
- Authenticate:
qryptic login -u <controller url> - Connect to a Gateway:
qryptic connect -
Current Status:
qryptic status - Disconnect from Gateway:
qryptic disconnect - Log out from controller:
qryptic logout
5. License
Qryptic is licensed under the AGPL-3.0 license.